最近的空閒時間比較忙(?),之前買了很多書結果都沒看… 直到這次連假才終於有鬆一口氣的感覺,於是我翻出了 Mastering Web Application Development with AngularJS 這本來快速消化一下。

所謂快速消化就是因為好像大部分的事情我都知道了(有沒有這麼厲害),希望快速從書中獲得資訊量(一些未知的事物),所以是接近連讀帶掃的方式來看書。想不到第二章我就被迫減速了。
第二章的主題是 “Building and Testing”,building 當然是早就已經熟得不能再熟,不過 testing 我還真的是從來沒寫過… 其實一直以來都知道 AngularJS 是非常推崇 test 這件事的,有許多關於 test 的影片或文章,而大部分的 open source module 也都有寫 test spec。
Angular is written with testability in mind, but it still requires that you do the right thing. We tried to make the right thing easy, but Angular is not magic. If you don’t follow these guidelines you may very well end up with an untestable application.
其實現在也只讀完第三章而已,這本書的範例寫法給了我很大的動力… 去寫 test。讓我們來看看第三章介紹 Promise 的其中一個範例就會知道為什麼了…
it('should illustrate basic usage of $q', function () {

  var pizzaOrderFulfillment = $q.defer();
  var pizzaDelivered = pizzaOrderFulfillment.promise;

  pizzaDelivered.then(pawel.eat, pawel.beHungry);

  pizzaOrderFulfillment.resolve('Margherita');
  $rootScope.$digest();

  expect($log.info.logs).toContain(['Pawel is eating delicious Margherita']);

});
自從第二張介紹完各種 test 大至上怎麼寫之後,作者之後的範例全部都用 test 的形式來演示!老實說我認真覺得這樣看起來蠻清楚的… 而且越看越覺得… 寫 test 好像還蠻有趣的(嗎?)
再加上由於日前進行自己一些 open source module 的開發中感受到要確保整體運作的困難度,又為了遵循 AngularJS 推崇的 test 理念,現在似乎是時候來進行首發 test 了!
建置環境
這邊說明一般的 Grunt 使用者應該如何從頭建置整個 test 環境。
首先關於採用的環境(新手入門就用比較快速一點的設定):
安裝 package
# node packages
npm install karma --save-dev
npm install karma-jasmin --save-dev
npm install karma-phantomjs-launcher --save-dev
npm install karma-chrome-launcher --save-dev
npm install karma-coverage --save-dev
npm install grunt-karma --save-dev
npm install grunt-connect --save-dev
npm install grunt-open --save-dev

# bower packages
bower install angular --save-dev
bower install angular-mocks --save-dev
使用 --save-dev 安裝之後,之後只需要用 npm install 及 bower install 即可馬上安裝上述全部的 package 了。
Karma 設定檔
/* file: test/karma.conf.js */

module.exports = function(config) {
  config.set({
    files : [
      /**
       * 與測試本體無關的 module
       */
      'bower_components/angular/angular.js',
      'bower_components/angular-mocks/angular-mocks.js',

      /**
       * 要測的 module
       */
      'lib/a.js',
      'app/main.js',
      'app/services.js',
      'app/controllers.js',

      /**
       * 測試用的 spec 擺這邊
       */
      'test/helper.js',
      'test/unit/*.js'
    ],
    basePath: '../',
    frameworks: ['jasmine'],  // 測試 framework,其它也可以用 mocha, chai, sinon 做組合
    reporters: ['progress'],
    browsers: ['Chrome', 'PhantomJS'],  // 可以自行修改想要哪些瀏覽器跑過,需要安裝 launcher package
    autoWatch: false,
    singleRun: true,
    colors: true
  });
};
Grunt 設定
這邊稍微列一下關鍵的設定,畢竟 Grunt 設定還是大部分因人而異。
/* file: Gruntfile.js */

module.exports = function (grunt) {
  grunt.initConfig({
    karma: {
      unit: {
        configFile: './test/karma.conf.js',
        autoWatch: false,
        singleRun: true
      },
      unit_auto: {
        configFile: './test/karma.conf.js',
        autoWatch: true,
        singleRun: false
      },
      unit_coverage: {
        configFile: './test/karma.conf.js',
        autoWatch: false,
        singleRun: true,
        reporters: ['progress', 'coverage'],
        preprocessors: {
          'my-module.js': ['coverage']
        },
        coverageReporter: {
          type : 'html',
          dir : 'coverage/'
        }
      }
    },
    connect: {
      coverage: {
        options: {
          port: 5555,
          base: 'coverage/',
          keepalive: true
        }
      }
    },
    open: {
      coverage: {
        path: 'http://localhost:5555'
      }
    }
  });

  grunt.loadNpmTasks('grunt-contrib-connect');
  grunt.loadNpmTasks('grunt-karma');
  grunt.loadNpmTasks('grunt-open');

  // single run tests
  grunt.registerTask('test', ['test:unit']);
  grunt.registerTask('test:unit', ['karma:unit']);

  // autotest and watch tests
  grunt.registerTask('autotest', ['karma:unit_auto']);
  grunt.registerTask('autotest:unit', ['karma:unit_auto']);

  // coverage testing
  grunt.registerTask('test:coverage', ['karma:unit_coverage']);
  grunt.registerTask('coverage', ['karma:unit_coverage','open:coverage','connect:coverage']);
};
第一個測試
馬上來寫下第一個 test spec !
/* file: first.spec.js */

describe('My very first test', function () {
  it('should pass', function () {
    expect(true).toBeTruthy();
  });
});
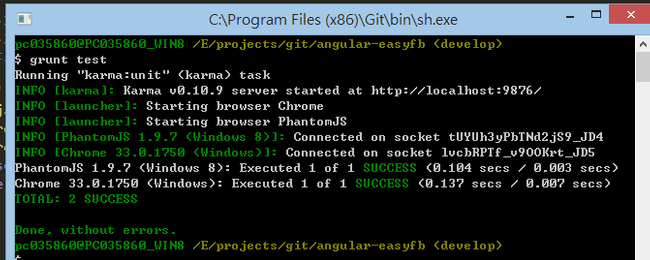
接著輸入指令 grunt test,應該就會看到下面的畫面,表示大功告成了!

接下來
讓整個 test 環境跑起來只是第一步,但也是很大的一步,畢竟未來你就可以盡情的對自己寫的 module 做各種測試了! 其實測試 spec 寫起來的感覺真的是既有趣又麻煩… 這是目前好不容易完成一個 module 的 spec 的感想。
為了順利寫出好的測試,必須釐清在測試環境下到底有些什麼工具存在,而 angular 方面又為測試提供了一些什麼東西,這就留待下一篇文章再介紹囉~
系列文章
AngularJS test 新手上路 (1) - 基本環境設定 AngularJS test 新手上路 (2) - 環境介紹
